Showing posts with label homemade. Show all posts

Thursday, July 11, 2013

Healthy Living - Part 1

I am going to begin a new series here on Crazylou, I hope you join me and invite your friends. Recently I was asked to attend a gathering at a neighbor's house. She was going to show us how simple it is to make our own natural products at home. Boy, am I glad I went! I didn't realize how easy and inexpensive it was to make your own products. And the benefits of it being natural is enough in itself!


So the first natural product I am going to share with you is the laundry soap. I couldn't believe how easily it came together. One thing is for certain though, if you use the powder version (the one I'm sharing today), you should probably invest in a inexpensive small food processor that you will use only for these natural products. (well, at least I am!)

Next, check your local grocery store, most often the larger stores will have a natural food area or natural product aisle where you can purchase most of these. Otherwise, I will include links to other inexpensive online stores you can order from. My neighbor also suggested checking out local Natural Food stores, too. We happen to have 2 in our immediate area. The prices listed below are what I found at our local store. Your area may be higher or lower. I've noticed that the online stores are a bit higher, too, but maybe more convenient!

Homemade Laundry Soap

Homemade Natural Laundry Soap (powder)
from Krista Brinkmeyer

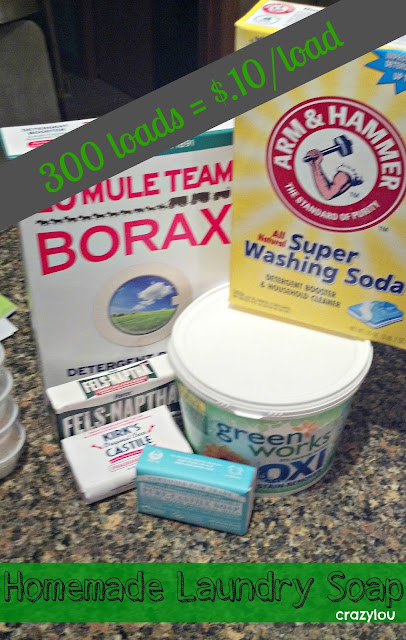
1 box of 20 Mule Team Borax (76 oz)
1 Container Oxyclean (3 lbs)
1 box of Arm & Hammer Washing Soda (55 oz)
1 bar of Fels Naptha Soap
3 bars of Dr. Bronners or Kirks Castile Soap

Shred all four bars of soap in food processor. (Krista notes: it is soap, which is clean, so you can just put it in the dishwasher, no need to purchase a new one)
Open all the containers and dump into a 5 gallon bucket that has a lid. (You can purchase one at your local hardware store, Home Depot, Lowe's, etc.)
Once your soap is shredded, dump it into the bucket. Secure lid and mix it up well.

To use: Add 1 Tbls to a large load of laundry  plus 1/4 c of white vinegar for fabric softener.

This is approximately 300 loads or 6 months worth of laundry soap!

Cost breakdown (at my local store):
Borax = $3.59
Oxyclean = $6.99
Arm & Hammer Washing Soda = $2.99
Fels Naptha Soap = $1.09
Dr. Bronners ($3.49/bar) or Kirks Castile Soap ($1.29/bar) = $10.47 or $3.87
Bucket = $5
Total = $30.13 (using Dr. Bronners) or $.10/load!
          = $23.53 (using Kirks) or  $.08/load!

GET OUT OF TOWN!!--isn't that so cheap??? Plus, using white vinegar for your fabric softener really works! No more nasty chemical filled dryer sheets needed!

For a printable recipe of this laundry soap, click HERE.

She showed us how to make many other homemade goodies. I'll share them with you soon. Here's a picture of all the samples I took home with me!


So, what do you think? Are you going to try this? Or do you already?

Here are the links to purchase these online through Amazon.com:
Borax Laundry Booster, 76 oz Box
Church & Dwight Co 03020 Arm & Hammer Super Washing Soda
Fels Naptha Laundry Bar and Stain Remover, 5.5 Ounce
Oxiclean Versatile Stain Remover Free, 3 Pounds
Castile Soap Original (3pk) 4 Ounces
Bar Soap Organic-Lavender 5 Ounces
Encore 250003 70-Mil Regrind Pail/Bucket, Black, 5-Gallon




Pin It!

Tuesday, December 18, 2012

Tasty Tuesday--Christmas Goodies

Well, it's only a week until Christmas! Seriously, where does the time go? This weekend, the kids and I put together our annual Christmas goodies for our neighbors. This is a tradition that was passed on to me from my mom. We would spend days making homemade cookies and then share them with those close to us. What a great gesture. Plus, it gives you extra bonding time with the kiddos!
This year I went for simple. I had foot surgery last week and I'm being forced to sit with my leg elevated most of the day. For those that know me personally, this is extremely tough to do! I managed to prepare most of these goodies in advance, only preparing two of them over the weekend.
Here is what we included this year:
1. Thin Mint Bark
2. Chocolate Peanut Butter Bark
3. Chicago Style Chex Mix
4. Brownie covered Peppermint Oreo's
5. Chocolate Chip Cookie Dough Truffles
6. Nutella Rice Krispy Treats

To find the recipes, just click on the name above and it will direct you to the sites where I found the recipes. In the Thin Mint Bark recipe, I used the Andes Mint Baking Bits instead of the Mint Chocolate Chips suggested. The only one I created myself was the Chocolate Peanut Butter Bark. This actually came from a fan suggestion on my Facebook page--and I'm glad she made it! It's so simple to put together and takes no time to prepare. For the Chocolate Peanut Butter Bark I took the rest of the package of chocolate graham crackers I used for the Thin Mint Bark. You put these on a tin foil lined jelly roll pan sprayed with cooking spray. Next, sprinkle half a bag of Reese's Peanut Butter Chips and half a bag of Semi-Sweet Chocolate Chips evenly over the graham crackers. Put in a 325 degree oven for 3-4 minutes. Take out of the oven and use the tip of a knife to cut through it, spreading it over the graham crackers. Place in freezer for up to an hour and break into pieces.

We packaged them up in kraft boxes I got in the Dollar Section at Target or round plastic containers I got during the after Christmas sale at Walmart last year. I included a little tag to let them know the contents, tied a ribbon and then the kids delivered!

Here are some pictures of my creations. 

If you love Thin Mint Girl Scout Cookies, you will really enjoy this easy treat!


 So easy and tasty! This is for those chocolate and peanut butter fans!

I've made this recipe many times and it is always a crowd pleaser! Try this soon!

I've made these several times with great success! Don't over bake AND make sure you run a plastic knife around them as soon as they come out of the oven!


These come together so quickly and are great for those that love to eat raw cookie dough! Except these don't have eggs in them so no need to worry about getting sick! These are best kept in the freezer!

I finally got around to making these and I'm so glad I did. Any Nutella fans will really enjoy this twist on your typical Rice Krispy Treats!

So, do you bake treats and deliver to your friends and neighbors? What are your favorites? You can find more of my favorites on my Pinterest board.
Come on over and join me! http://pinterest.com/crowe/ 

Thanks for visiting Tasty Tuesday!

Cindy


Pin It!

Saturday, December 15, 2012

Homemade Christmas--Customized Photo Board

I've got another easy, customizable Christmas gift you can give to one of your favorite people. Many months ago I purchased these boards from Pick Your Plum (check out this daily site if you haven't already--such cute things!) and I have been waiting for a creative way to use them. When I visited a craft fair this fall, I saw photo boards with sayings on them and it struck me--that is what I would do with my boards--with my own twist of course!

I spray painted the boards with flat black spray paint and sanded the edges. Next I picked out a scrapbook paper that I liked and that coordinated with the saying that I was putting on the photo board. I applied a layer of Modge Podge on the board before applying the paper. Then I sanded the paper to give it rough edges. For this gift, I used copper glitter words that I bought at Michael's. I adhered them to the scrapbook paper with Modge Podge and let dry. Then I added some decorative flowers to give it a little extra touch. I added the photo corners on the little blocks so the recipient could add her favorite photos.

I loved how super simple this was, but so personal. I gave this to one of my dearest friends I met in college and still remain very close to. She is a great friend and I wanted to let her know that she was one of my Forever Friends.

Have a great day!

Cindy


Pin It!

Monday, December 10, 2012

Homemade Holiday's--Chalkboard Painted Wine Glasses

Can you believe Christmas is only two weeks away? Are you finished shopping yet? I'm almost done--infact, I'm just wrapping up a few crafty projects from my Homemade Holiday gifts. Today's feature is an easy, personal gift you can give to a wine connoisseur in your life. 

These were fairly inexpensive too. I went to Target (love!) and bought a 4-pack of red wine glasses. Bought some chalkboard spray paint (you can also use the kind you brush on) and a chalk pen. I taped off the wine glass and stem and just painted the base. I used 2 coats of chalkboard paint for each glass--waiting for it to dry completely in between coats. Next, I wrote a saying on the base of each glass and adorned each of them with a shiny gem that I hot glued on.

I was so pleased with how they turned out and I think the recipient will love them to. What do you think?


Have a great week!

Cindy

Pin It!

Saturday, December 8, 2012

Homemade Christmas--Cookbook Binder

I've got a simple gift solution for a cook in your life! I actually made this a few years ago for a friend's birthday, but it makes a great Christmas gift too. She mentioned to me once that she has lots of recipes to try, but doesn't have anywhere to put them! AHA! I've got a solution! This was easy to put together and I customized it to her families tastes. I used my computer and cricut, but you could totally use stickers and chipboard to get a similar look.

Supplies

3-ring binder (2 inch or larger)
Dividers
Photo corners
3-ring plastic sleeves
Recipe cards

First I printed out all the cookbook catagories in a font that I likes for the tabs of the dividers. I glued them onto two different coordinating scrapbook papers (red and blue were used here!) before I attached them over the tabs.

Next, I added scrapbook paper to the dividers to make them look pretty--again, using red and blue. I printed out the category name on white cardstock and glued into onto the scrapbook paper (I also used a sponge and an ink pad and shaded the edges, just to add another element). I used a scroll from one of my Cricut cartridges and attached it to the top of each category page.
Then, I added colored paper with 2 recipe cards on each page, using the clear photo corners to keep them in place. I also added several clear plastic sleeves that she could add recipe clippings into.

For the cover, I use my Cricut to cut out the letters and attached them to a coordinating piece of scrapbook paper, attached a cute little ribbon and I was done!
This project took me about an hour and a half to make! I am really happy with the result and I believe my friend loves it--which is the best part!

I think it's special to give friends and family homemade gifts--it's a way for you to express your gratitude, almost like giving a little bit of yourself to them, too. Wait until you see what else I've been up too!
Cindy

Pin It!
Related Posts Plugin for WordPress, Blogger...