Showing posts with label photos. Show all posts

Thursday, July 18, 2013

Guest Post: ellie from Creative Geekery! DIY Wall Art


I've got a treat for you today! My blogger friend ellie is here to share a great way to find fabulous pictures and make them into Wall Art. Please welcome ellie from Creative Geekery!


I have several funky photos (that I did not take!) framed around my house. Recently a friend asked me where I got them from and I explained that they were totally DIY. I usually get a little nervous anytime someone says those three little letters (DIY) so trust me, if I can pull this off, you can, too! Today I will introduce you to a website called flickr! There you can spend hours perusing beautiful photos that users upload for your enjoyment. In this post, we will focus on finding the art. In the second part of this mini-series, we will talk about getting it printed and framed for the least amount of money possible!


a few of my "creations"

So here we go!


PART ONE: Finding the art.


1. Go to www.flickr.com. One thing I love about this site is that there is no need to create an account unless you want to upload your own photos. Keep this post open in one window and have flickr in another so you can follow the instructions.


2. Click in the little SEARCH box in the upper right hand corner and type in what you are looking for. In this example, I searched for a merry go round. Click the little magnifying glass in the SEARCH box.


3. Once the results come up, click on the ADVANCED SEARCH link to the right of the SEARCH button. Do not skip this step or you will end up possibly falling in love with a photo that will not work for this project (i.e. it will look great on your screen but not in print).


4. Check the box next to "Only search within Creative Commons-licensed content." This will ensure that you will only be choosing from photos that you will be able to download and print. Many photos are totally copyrighted and even though this project is for personal use, the photographer may have disabled downloading to protect his or her work.


5. Now comes the fun part: your search results! Flickr lets you sort your results three different ways. Two of the three come in super handy: relevant and interesting. Try clicking on each to see what type of photos come up. I have had great results with both depending on what I am looking for.


6. Once you find the photo that you like, click on it and then click on VIEW ALL SIZES (up and to the right of the photo).


7. Click on the largest size option that is available. "Original" is the best if it is an option! 

8. Right-click (or control-click if you don't have a right mouse button) and download that puppy! Now it is saved on your computer and you are ready for STEP TWO. Printing and framing. Woot woot! 


Bonus Tip: I really wanted a photo of Grand Central Station in our home because we LOOOVE our trips to the city so much. I found one that I LOVED and then decided to see what else that flickr user had posted. I ended up with super cool pictures of completely different things (flowers and a bumblebee, a ferris wheel, and the coast line) that work well together because they are all the same photographic style and feel. To view all of the photos from one artist/user click on the user's name (below the photo you will see "from Joe Schmoe"... click on Joe Schmoe).

Have fun! XO, ellie


Pin It!

Wednesday, May 15, 2013

Wood Photo Block

Happy Wednesday! I'm sharing a project I made for our mom's for Mother's Day this past weekend. (by the way, here is a pic of me and my kiddos on Mother's Day--aren't they cute?)

Okau, now on to the project! I originally saw this idea from the Groopdealz daily email about a month ago. I already had the supplies on hand so this project/gift cost me nothing! Even if you didn't, it still wouldn't cost that much to put together.

Wood Photo Block

Supplies
Wood block (size depends on how many photos you'd like to display)
Scrapbook paper
Vinyl letters or stickers
Modge Podge
Mini Craft Clothes Pins
E600 Glue

Directions
Sand the wood block and wipe away dust. Measure scrapbook paper to fit the size of your wood block. I chose a neutral paper. Apply Modge Podge to the wood block and carefully place the paper over top. Smooth out the paper. I also sanded the edges of the paper for a "rough" look. 
Cut out the saying you want to put on your block. I used the one that was on the Groopdealz, because I thought it was perfect. But, you could use this for Graduations (Class of 2013), Mother's Day (My Precious Blessings), Father's Day (My Cool Kids), etc. Once you have your vinyl letters or stickers ready, place them on the block, centering it on the block, but also allowing space on top for the clothes pins. 
Next, space out the clothes pins evenly. Apply E600 glue to the back of the clothes pins and place in desired spot. Allow to dry. Find your favorite pictures, cut to size and stick in the clothes pin! 
This project came together quickly, too. With the drying time included, it was less than 1 hour! I love how these turned out--and I believe the Grandma's loved them too!

Wood Photo Block


What do you think? Cute, huh? I'm loving the expression on Carson's face in one of the pictures--priceless!!

Thanks for stopping over today! Please be sure to follow me on Facebook, Twitter and Pinterest!


Pin It!

Monday, March 4, 2013

March Fitness Challenge Photos

Hello peeps! I hope you had a great weekend! Too bad it's Monday already and I'm heading to work! And bummer, more snow is expected too. I WANT SPRING! So, how many of you are doing the March Fitness Challenge? I started on Saturday, today is my second day! (if you haven't joined yet, you still have time! Click here for the details!)Those V-Ups are a killer! I figured I would show you the exact move you should be doing for each exercise as well as a few Trainer Tips.
My friend, motivator and trainer Linsey was kind enough to help me out with these pictures as well as the Trainer Tips. Linsey is amazing. I met Linsey at the Y where I workout. She is a trainer and fitness instructor at the Y. She is a mix of Bob and Jillian from the Biggest Loser--and I love that about her! She is energetic, fun and silly. She makes every class worth attending. For me, she is a great motivator because she cares about your goals and knows when to push and when to lay-off. And I love that she knows where I'm coming from. She has fought the fight to be fit). Have I mentioned that she is amazing? Anyways, on to the pictures...

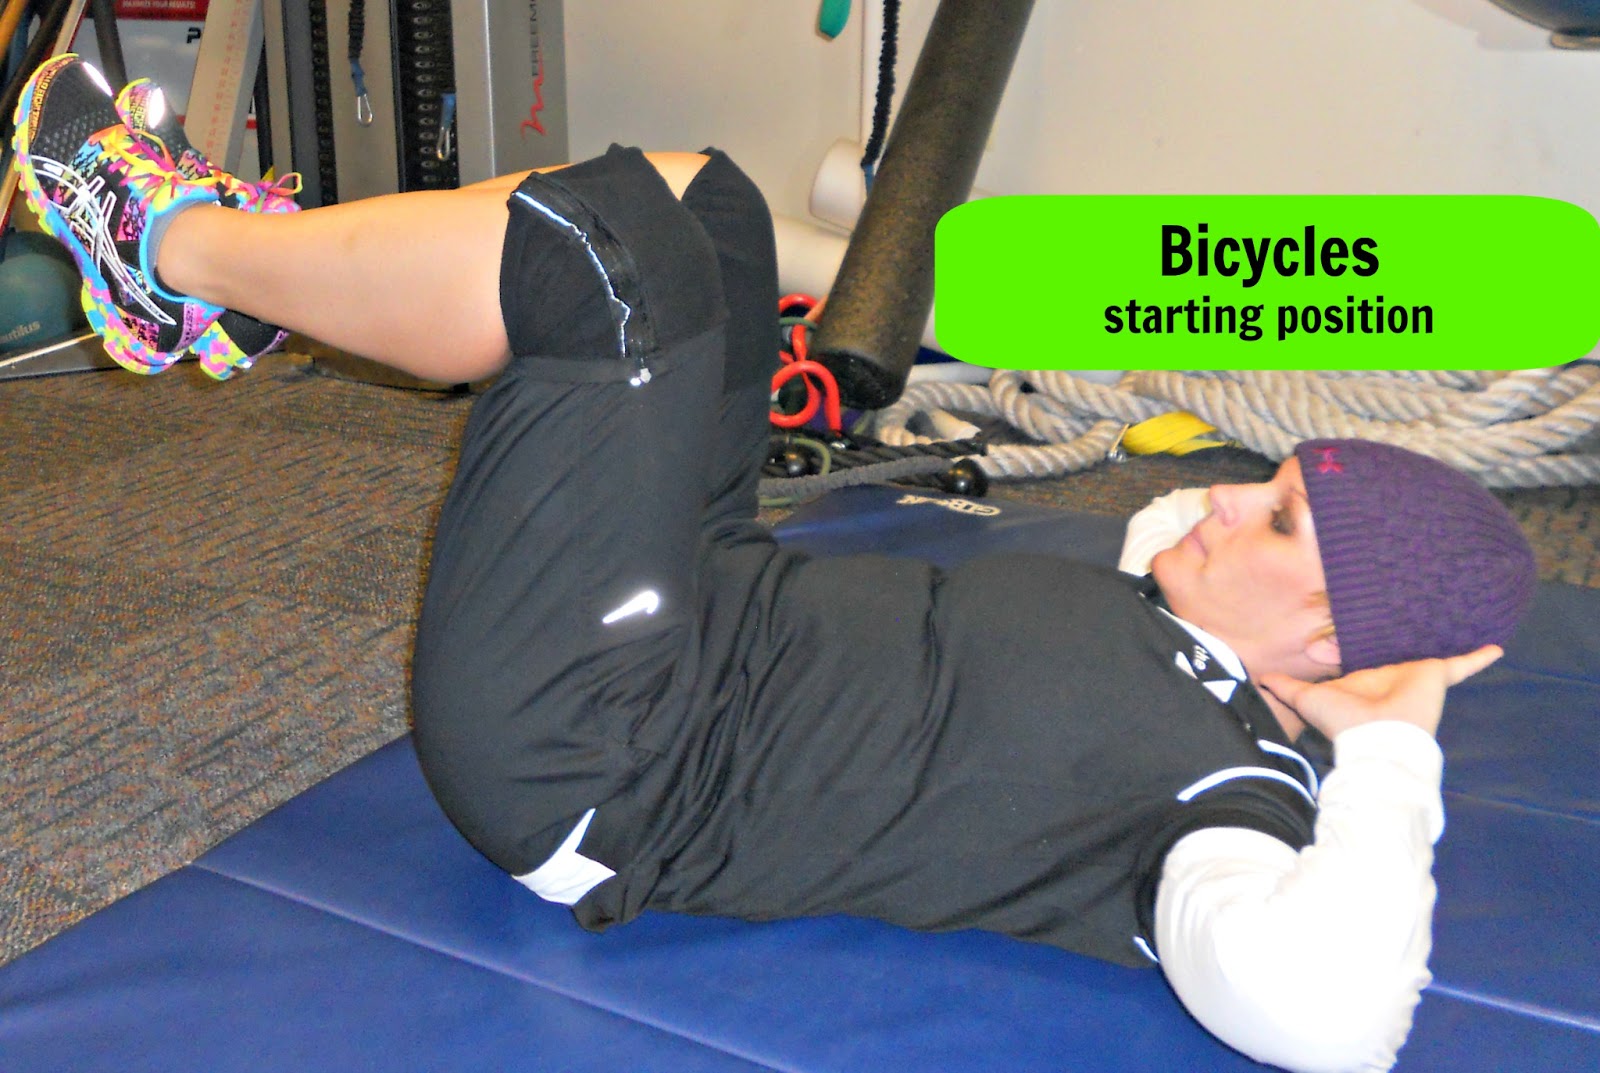
On all moves, remember: chin off the chest, keep core engaged with belly button pulled towards spine, and shoulders down and out of the ears.


Scissor Kicks
Trainer Tips:
To help support lower back, hand can be placed to the side and slightly under hips. To advance move, pull shoulder blades up off of the floor in crunch position with chin off of the chest.

scissor kicks


scissor kicks


Bicycles
Trainer Tips:
Fingertips placed behind the head, not interlocking to refrain from putting extra strain on the neck. Elbows should be wide at all times. Drive up with the core/chest to pull shoulder blades off of the floor.
bicycle starting position


bicycle crunch


Toe Touches
Trainer Tips:Keep chin off the chest.

toe touches starting position


toe touch crunch


Double Crunches
Trainer Tips: Remember to keep chin off of chest. Fingertips only to back of head, never interlocking to refrain from putting extra strain on neck. Feet flexed, and tucked towards bottom.
double crunch


double crunch

V-Ups (or Jack Knife)
Trainer Tips: Move shown is advanced with legs straight.  If move is to difficult to begin then start with bent knee and graduate to straight leg. Also, a side note that if existing shoulder issue exists, complete arm movement as a chest press vs. a pullover. Chin off of chest always.
v-up of jack knife


v-up or jack knife


Plank
Trainer Tip: If doing bridge position from forearms ensure the elbow is directly under the shoulder. Head and neck are in alignment with spine, looking towards the floor. In high position wrists should be positioned directly under the shoulder. Head and neck in line, neutral with the spine.
plank beginner


plank on forearms


planks on hands


Thank you Linsey (isn't she the cutest?) for squeezing in time for this photo shoot so I could provide my readers the proper technique! If you have any questions, post a comment and I'll be sure to have Linsey answer them for you!

Cindy

Pin It!
Related Posts Plugin for WordPress, Blogger...