Friday, May 31, 2013

PINTASTIC Friday!

Wow, with the holiday on Monday, this week certainly flew by. Is it me or did you second guess what day it was almost all week long?! Geez...I think I'm getting old. 

I'm running in the Color Vibe this weekend...hoping to post pics early next week, but if you don't want to miss out, follow me on Instagram--they will be there for sure! Here are a few pictures from last night, which I posted to Instagram:
My little man got to play catcher last night in his baseball game. He did great!

The game got cut short because of a storm rolling in...cool pic, huh?

Now...onto the pins...


Let's start this off on the right note:

Wow...two versions of this Strawberry Drink (one alcholic and one kid friendly).
Check out Crazy For Crust for the recipes.

I love baked Sweet Potato Fries...these look tasty!

Happy Hour Projects makes everything look so easy in her tutorials! I really need to try this!


Until next time...I hope you have a fabulous weekend! Thanks for stopping by!


Pin It!

Thursday, May 30, 2013

School is over--Summer is here!

My kids were officially out of school at the beginning of last week--can you believe that? And I'm already hearing the "we're bored!" phrase from them! Seriously?!?! I wanted to share the quick and easy gifts we prepared for their teachers for the end of the year. We also did something for each of the teachers for Teacher's Appreciation Day.

My daughter had inspiration from my Painted Tumblers I shared here on the blog and created a supply holder for her teacher. Hailey hand painted the jar with the school colors; I think she did a great job. I added an etched letter "P" for her teachers last name. We filled the glass jar (from IKEA) with paper clips, thumb tacks, pens, pencils and a hanging ceramic Thank You plaque. Cute and practical! She also wrote a thank-you note!
Hand Painted Teacher Gift

Hand Painted Glass Jar

For Carson's teacher, we decided on a simple gift. She was a Substitute Teacher for the last month and a half while his real teacher had a baby. I got the idea from Pinterest, which brought me to the Skip to my Lou blog. I took it one step further and decorated a large clothes pin clip with Washi Tape and sealed it with Modge Podge. He also wrote a personal thank-you note.


Are your kids out for the summer? What do you have planned?


Pin It!

Tuesday, May 28, 2013

Tasty Tuesday--Skinny Pop Cupcakes

Happy Tuesday! Did you enjoy your Memorial Day celebration? Our weather didn't cooperate, but we still had a nice time grilling out with our neighbors! 

I shared this simple and guilt-free dessert over at Hungry Little Girl awhile back. In case you missed it, I thought I'd share it on today's Tasty Tuesday! This tasty treat only uses 3 ingredients! I originally got this idea from Hungry Girl—she uses diet pop in cake mixes to create a low-fat version of the real thing. We’ve had these yummy cupcakes several times; I’ve even made these treats for a friend with child that had an egg allergy. You can vary the taste/color by the type of diet pop you use. One of our favorites is the Diet Sierra Mist Cranberry mixed with Confetti Cake Mix. The cake couldn’t be easier to put together..so let's get started.

Skinny Pop Cupcakes
(makes 24 cupcakes)
 
Ingredients
1 Box Cake Mix
1 Can Diet Pop, suggest Diet Cranberry Sierra Mist or regular Diet Sierra Mist
1 Tub Low-Fat Cool-Whip
Sprinkles (optional)

Directions
Crazlou's Skinny Pop Cupcake Place the dry cake mix in a large mixing bowl. Slowly pour the diet pop over the cake mix and stir until well combined. Fill cupcake cups evenly, 2/3 full. Follow instructions on the back of the cake mix for oven temperature and increase the time by 3-5 minutes (watch closely). When cupcakes are cooked (gentle thumb print should disappear), cool on rack. Once cool, pipe or dollop with low-fat or fat free Cool-Whip. Adorn with sprinkles if you’d like. Keep in frig until ready to eat or serve.

Skinny Pop Cupcakes


So, what do you think? All I can think of is...YUM!


Pin It!

Monday, May 27, 2013

Recipe Swap featuring Candy Girl


Hello there!  I'm Candy from Candy Girl.

I'm thrilled to be participating in the Good Old Fashioned Recipe Blog Swap with Cindy here at Crazylou!

Caramel-Pecan Sheet Cake wasn't the recipe I planned on sharing here but after tasting it I knew it was too good to keep to myself.  

My husband's favorite dessert is his mother's yellow cake with caramel icing.  For years I heard him go on and on about how good it is. My mother-in-law only seemed to make when I wasn't around but that didn't stop me from trying to replicate it several times.  Each attempt tasted good to me but was always met with "It's good, but it's not the same as Mom's." from my husband.  Desperate to get this right I called her for the recipe and found out it was simply a boxed cake mix and a simple caramel sauce.  My mother-in-law is old school and doesn't cook with recipes or a cookbook so the directions I received were vague and I ended up with another fail on my table.

About a year ago I finally got to taste a slice of the infamous caramel cake.  I love my mother-in-law and she is a great cook, but I didn't see, or taste, what all the fuss was about.  My two sister-in-laws were there and told me that they had tried to make the cake too but it was never right.  I'm not accusing my mother-in-law of leaving an ingredient out or purposely not relaying the recipe correctly, but something was missing.  Let's just say it was mother's love.

This Caramel-Pecan Sheet Cake is the closest I've come to taking the Best Caramel Cake award from my mother-in-law.  I knew it was a contender at first bite.  Incredibly moist, the cake is flavorful from on its own the layer of caramel frosting takes it over the top.  

Cut the pieces bigger than you think you need to.  Trust me.


Please visit one of these lovely ladies to see the rest of the blog swaps - Julie {White Lights on Wednesday}Kelley {Miss Information} or Rachel {i love my disorganized life}.


Caramel-Pecan Sheet Cake
Taste of the South, May/June 2013

1 cup butter (2 sticks)
1 cup water
2 cups all-purpose flour
2 cups sugar
1 teaspoon baking soda
1/2 teaspoon salt
1/4 teaspoon ground cinnamon
1/4 teaspoon ground ginger
1/2 cup sour cream
2 large eggs
1 teaspoon vanilla extract
Caramel Frosting (recipe follows)
1 cup chopped pecans, toasted

Preheat oven to 325° F.  Spray a 15x10-inch jelly-roll pan with nonstick baking spray with flour or butter pan well.  Set aside.

In a medium saucepan, bring butter and 1 cup water to a boil.  In a large bowl, whisk together flour, sugar, baking soda, salt, cinnamon, and ginger.  Add hot butter mixture to flour mixture, beat at low speed with an electric mixer just until moistened.  Add sour cream, beating well.  Add eggs, one at a time, and vanilla.  Pour batter into prepared pan.

Baked until cake is lightly browned and a wooden pick inserted at the center of cake comes out clean, 25 to 30 minutes.  Let cool on a wire rack for 20 minutes.

Pour hot Caramel Frosting over warm cake, spreading to edges.  Sprinkle with pecans.  Let cool completely on wire rack.

Caramel Frosting

1/2 cup butter (1 stick)
1 cup firmly packed light brown sugar
1/2 teaspoon salt
1/2 cup sour cream
2 1/2 cups confectioners' sugar
1/2 teaspoon vanilla extract

In a large, heavy saucepan, bring butter, brown sugar, and salt to a boil over medium heat, stirring constantly.  Remove from heat; slowly stir in sour cream.

Bring mixture just to a boil over medium heat, stirring constantly.  Remove from heat.

Sift confectioners' sugar.  Gradually add confectioners' sugar and vanilla, beating at medium speed with a mixer until smooth.  Use immediately.  
 

Pin It!

Friday, May 24, 2013

PINTASTIC Friday!

Here's another addition of Pintastic Friday! Hope you had a great week and fun plans for the holiday weekend! I can't believe it is Memorial Day weekend already!

My first Pin that I am featuring this week caught my eye because our family will be taking a vacation to England this summer...I need all the help I can get planning it!
 
Check out Your Home Based Mom and her suggestions for London.
 
Not that I'm a fashionista or anything, but I love this look!
Head over here to see more Summer Fashion Trends.
 
And since this weekend is the kick-off to BBQ season...
Check out these 35 awesome ideas at Hezzi-D's Books and Cooks!
 
 
So, there you have my 3 favorite pins of the week. Tune in on Monday...I have a special guest visiting! Have a super weekend!!


Pin It!

Tuesday, May 21, 2013

Tasty Tuesday--Steak Marinade

Happy Tuesday! Hope your week is off to a great start. If you follow me on Instagram (if you are on Instagram, please follow me!), you've seen this picture before. Well, I promised you the recipe, so here it is. This is actual my big brother's famous recipe. I always use it on steak, but I'm certain it would be good on poultry and veggies, too!

Marinade--good with beef, poultry or veggies


Brian's Marinade

Ingredients
3/4 c. dry red wine
1/2 c. olive oil
1 Tbls. Chopped onion
1 Tbls. Worcestershire Sauce
1/3 c. ketchup
1 Tbls. Chopped Rosemary
1/4 tsp. pepper
6 drops Hot Sauce
1/2 tsp. Italian Seasoning

Directions
Combine all ingredients in a large Ziploc bag. Add 2-4 lbs. steak. Marinate in frig for at least 3 hours. Take steak out of frig and allow to come to room temperature before cooking. Grill to perfection. Enjoy!

Okay, I think I know what we will be having for dinner later this week! Mouth-watering!!

Have a great day!


Pin It!

Monday, May 20, 2013

Super Cool Science Project

Today is the official "LAST DAY OF SCHOOL!" The kids are out for the summer in just a few short hours! Yikes! Since I work full-time, the summer schedule for the kiddos always seems more stressful than it should be! But, at least the kids are excited for the break!

Just a week ago, we had our School Science Fair, and Carson decided to participate. He wanted a "cool" project. So, what does a crafty mom do? Yep, I went on Pinterest! I found that I had already pinned this PIN, so I printed it off and showed him and he thought it looked "super cool." Bonus! It looked fun and appeared to not take a long time to put together OR a lot of supplies. SUPER BONUS!


Pop Rocks Science Project

It was a success! And, for the most part, Carson did the project on his own. He gave me his own words on why/how it worked, and I printed it out on the computer and made fancy letters for the display board on my Cricut!

So here's the fun experiement:

POP ROCKS EXPERIMENT
from Steve Spangler Science

Materials
16-20 oz bottles of soda pop (we used 6 different varieties)
Individual packets of Pop Rocks (one for each bottle of pop)
Balloons (one for each bottle of pop)

Instructions
1. Carefully pour Pop Rocks into a balloon. We (the parents) did this part. One of us held the balloon open while the other poured. You could also use a small funnel if you had one handy.

2. Remove lid from the pop bottle. Carefully place the Pop Rock filled balloon over the pop bottle opening. DO NOT POUR POP ROCKS IN YET. Parents are good at doing this job, too.
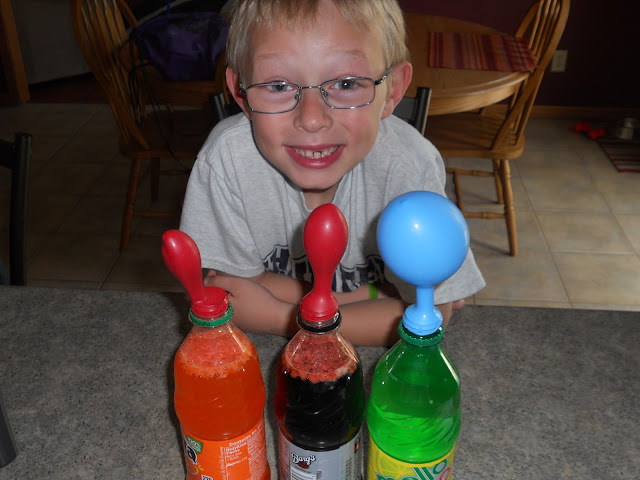
3. Turn the balloon upside down and dump the Pop Rocks into the pop. Watch what happens! ( I love his reaction in this picture!)

Pop Rocks Experiment


4. The Pop Rocks and Pop both contain Carbon Dioxide. When they are mixed together, the gases create bubbles and air, which fill up the balloon. So fun! We tested Mello Yello, Sunkist and Root Beer. We voted and thought that the Root Beer and Sunkist would produce the biggest balloon. Look what won:
Pop Rocks Science Project
The Mello Yello! And during the Science Fair, we tried Sprite, Diet Coke and Coke. Carson voted for Diet Coke and we voted for Coke. Coke won this time, but in all fairness, the Diet Coke balloon had a leak in it when we put it over the pop bottle!
Pop Rocks Science Project

Carson had fun! He earned a certificate and ribbon for participating. They also handed out Door Prizes and his name was selected for that, too! See, science can be fun!

Thanks for stopping over today! Hope your week is off to a great start! Have any tips for me to keep my kiddos occupied all summer? Please comment below! Thanks!


Pin It!

Friday, May 17, 2013

PINTASTIC Friday and a Recipe Swap!!

Yes! It's Friday! I've got some fun news to share with you today. I’m participating in a Good Old Fashioned Recipe Blog Swap! Julie {White Lights on Wednesday}, Kelley {Miss Information} and Rachel {i love my disorganized life} have paired up 30 incredible bloggers to trade blogs for the day.

Candy from Candy Girl and I will be sharing a fabulous recipe on each other’s blogs {but we can’t tell you what they are, because they’re a secret!}. Be sure to visit both of us on May 27th, we wouldn’t want you to miss out on any deliciousness!
Now, onto with the top PINs of the week!


How amazing do these Stackers look? You can thank the Lady Behind the Curtain for these!
Mouth-watering. Enough said. Check out the awesome blog of Real Housemoms for the recipe.

Summer starts for us on Tuesday. This list is going to come in handy!
Check out Creative Geekery for the printable version!


I've got a jammed packed weekend planned--kids sports, a retirement party, wedding and hopefully some flower planting. Hope you enjoy the weekend!(Oh, and the last day of school is on Monday already!) UGH!


Pin It!

Wednesday, May 15, 2013

Wood Photo Block

Happy Wednesday! I'm sharing a project I made for our mom's for Mother's Day this past weekend. (by the way, here is a pic of me and my kiddos on Mother's Day--aren't they cute?)

Okau, now on to the project! I originally saw this idea from the Groopdealz daily email about a month ago. I already had the supplies on hand so this project/gift cost me nothing! Even if you didn't, it still wouldn't cost that much to put together.

Wood Photo Block

Supplies
Wood block (size depends on how many photos you'd like to display)
Scrapbook paper
Vinyl letters or stickers
Modge Podge
Mini Craft Clothes Pins
E600 Glue

Directions
Sand the wood block and wipe away dust. Measure scrapbook paper to fit the size of your wood block. I chose a neutral paper. Apply Modge Podge to the wood block and carefully place the paper over top. Smooth out the paper. I also sanded the edges of the paper for a "rough" look. 
Cut out the saying you want to put on your block. I used the one that was on the Groopdealz, because I thought it was perfect. But, you could use this for Graduations (Class of 2013), Mother's Day (My Precious Blessings), Father's Day (My Cool Kids), etc. Once you have your vinyl letters or stickers ready, place them on the block, centering it on the block, but also allowing space on top for the clothes pins. 
Next, space out the clothes pins evenly. Apply E600 glue to the back of the clothes pins and place in desired spot. Allow to dry. Find your favorite pictures, cut to size and stick in the clothes pin! 
This project came together quickly, too. With the drying time included, it was less than 1 hour! I love how these turned out--and I believe the Grandma's loved them too!

Wood Photo Block


What do you think? Cute, huh? I'm loving the expression on Carson's face in one of the pictures--priceless!!

Thanks for stopping over today! Please be sure to follow me on Facebook, Twitter and Pinterest!


Pin It!

Tuesday, May 14, 2013

Tasty Tuesday--Mexican Pork Tacos

This weekend, I took a risk. And boy did it pay off! I've never made or tasted pork tacos before but after seeing this delicious post a while back on Our Best Bites blog, I knew I had to make these. Now, it's a little time consuming, but very easy to do. I think the next time I make these, I'll try the first part of the recipe in the crock-pot or we will only be able to enjoy these on the weekend.

Mexican Pork Tacos
Recipe from ourbestbites.com

Ingredients:
3-4 lb boneless pork shoulder roast
Water (to cover pork in pot)
1 onion, halved
4-6 garlic gloves, smashed, peeled
2 Tbls lime juice (1 lime)
2 Tbls red wine vinegar
1 tsp oregano
1 tsp cumin
2 bay leaves
salt & pepper to taste
1 orange

Directions:
Place oven rack in the lower middle position and preheat oven to 300 degrees.
Trim pork of fat and cut into 2 inch chunks. Place pork in oven-safe pot, add enough water to cover pork. Add onion, garlic, lime juice, red wine vinegar, oregano, cumin and bay leaves and juice from orange. Toss orange rinds into the pork mixture after juicing. Stir to combine Bring to boil over medium heat. 
Cover pot and transfer to oven. Cook for about 2 hours or until pork falls apart when poked with fork.
When pork is ready, remove orange rinds, onion, bay leaves. Line a rimmed baking sheet with foil. Using slotted spoon, transfer the pork from the liquid to the foil-lined pan and set aside.
Return the pot to the stove and bring liquid to a boil over high heat. Boil 8-15 mintues or until liquid is thickened to about 1 cup.
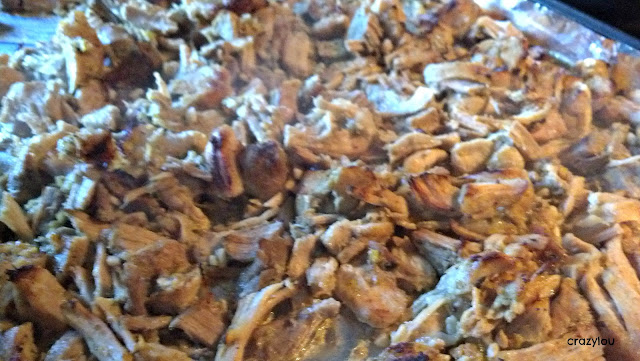
Meanwhile, shred pork with fingers fork. Drizzle with the liquid. Place under the broiler for 5-8 minutes or until the pork starts to brown. Flip pork over and return to the broiler for another 5 minutes. Serve in warmed corn tortillas with your favorite toppings.
Mexican Pork Tacos
You can actually see the steam coming from these pork pieces!


The kids were a little hesitant to eat them because it was pork, but the flavors were so good--they both ate them right up! I think next time not only will I try it in my crock pot, but I will keep the orange rind out. I think it was a little "over" citrusy for my taste! But it was a definite winner at the dinner table!

Enjoy!


Pin It!

Sunday, May 12, 2013

Happy Mother's Day! {Free Printable}

To all the wonderful moms out there--Happy Mother's Day! I hope you enjoy your day! I hope mine is filled with giggles and hugs!

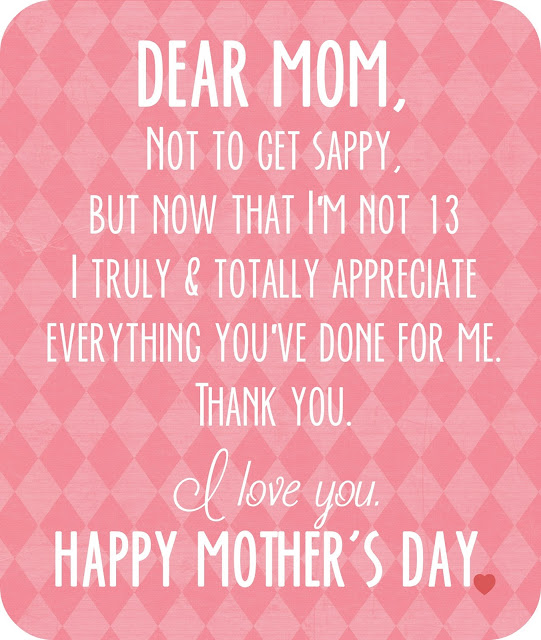
I've shared a few printables the last few Sundays, just for mothers. This is the final one. This quote or saying is so true. At 13, we have no idea what our Mothers do for us. I have a daughter that is quickly approaching the wonderful age of 13 and I know one day, she will be thinking the exact thing I am today. I love and appreciate my mom so much. She is amazing. Thank you mom for all you've given me and still continue to give. So lucky you are my mom.

To Print, right click picture, select SAVE PICTURE AS, and save in the file you desire as a JPEG. Print on card stock!

Happy Mothers Day quote printable


Pin It!

Friday, May 10, 2013

PINASTIC Friday!

Wow--am I happy it's finally Friday! Last weekend was busy with sports and a fun 5K Color Run for charity.  Here's a few snapshots:

Carson's baseball season is in full swing. He gets so excited on game day! We also had Hailey's volleyball game on Saturday, too, but those pictures never turn out (in the gym!).


Our first Color Run 5k--Hailey did it with many of her classmates! What fun!

Here we are after the run!
 
Carson & I after the run--he ran with me the entire time! Way to go buddy! This is his second 5K!


Now, on to my favorite pins!


Make at home foot soak--check out how easy it is to do at Tidy Mom.

I'm drooling over these! I love General Tso's Chicken, so these must be good! Click here for the recipe.

These are adorable! They would make great gifts for all sorts of occasions. Get the low down over at Nothing But Country.


Hope you enjoy your weekend--Happy Mother's Day !


Pin It!
Related Posts Plugin for WordPress, Blogger...