Saturday, March 30, 2013

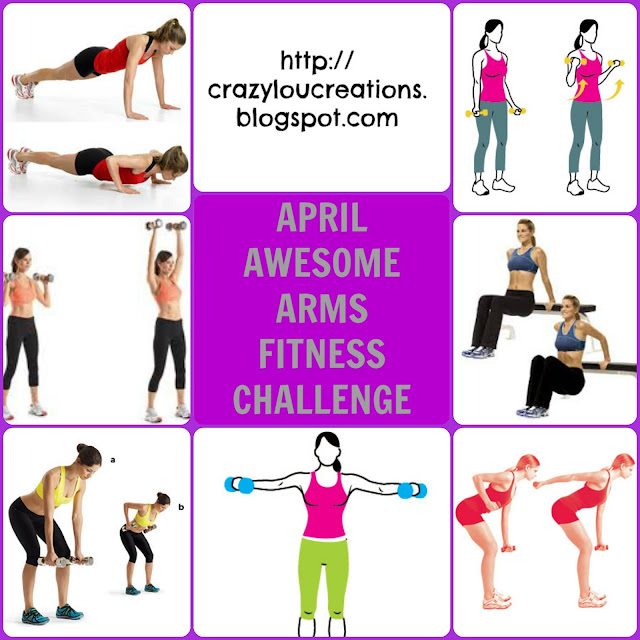
Awesome April Arms--Fitness Challenge

Hi! How have you been? Did you tackle my March Fitness Challege? I tried. I failed, miserably. Those v-ups were killers, which probably means I need to do them more! I never made it to the four sets, but did the 2 sets consistently. Something is better than nothing, right?

Well, Spring is upon us (even though the weather isn't cooperating) and that means we will be showing off our arms more (mine are really pale!) which means its time for another Fitness Challenge just for our arms.

I found this workout over at FitSugar and I think it is the perfect way to get those toned arms ready for Spring and Summer (aka sleeveless tops, maxi dresses...). You can add this to your daily cardio routine or as they suggested, pair it with your lower body workout. I am going to do this 3 times a week for the entire month. I'm using 8 lb weights at home and 10 lb weights at the gym, but you can use whatever weights you have. Don't have weights? Nonsense...use soup cans or filled water bottles! The important thing to remember is to feel fatigued on the last couple of reps. If you aren't, you need to move up in weight.

You can click on the picture and print it or PIN it for future use!
arm exercise printable

I found examples of the exercises on Women's Health Magazine's website--it's a great resource for healthy recipes, workouts, etc. And they offer daily/weekly email newsletters, too!:

Arm Fitness Challenge

PUSHUP Photo: womenshealthmag.com


BICEP CURL Photo: womenshealthmag.com


SHOULDER PRESS
Photo: blog.womenshealthmag.com


BACK ROWS Photo: womenshealthmag.com


TRICEP DIPS Photo: womenshealthmag.com


LATERAL RAISE Photo: womenshealthmag.com


TRICEP KICKBACKS Photo: womenshealthmag.com


So, what do you say...are you going to join me? Hope so! Let me know if you're in!

Cindy


Pin It!

Thursday, March 28, 2013

The Bond of Sisterhood

Today, I'm writing to you about dealing with a friend in pain and the bond of sisterhood. I don't have any living blood sisters, but I have plenty of other sisters in my life. See, if you recall, I founded a Sorority with 15 other amazing women. And through the years, that Sorority has given me the greatest gift of sisterhood. Even those sisters that I didn't go to school with or perhaps only met briefly at a Sorority event 5 years ago or maybe I only know them through Facebook--they are still my sisters. We have an amazing bond. Let me share with you an example of what I'm talking about.

A short while ago, one of our sisters dealt with the tradegy of losing her daughter suddenly. It broke our hearts. We ached. Although we knew it was nothing compared to the pain our sister was going through. It sparked a long conversation thread on Facebook. Not only were we trying to wrap our heads around the situation (most of us have children the same age), we wanted to make sure some of us would be able to attend the wake/memorial as well as the funeral. And, we wanted to make sure we could do something for the family. Each of us took time to think about how we could help. We decided that the Sorority would send an floral arrangement to the services and the Alumni Association would purchase engravable wind chimes with the sweet child's name and dates as well as a fitting quote.

But, how can we show our support? One suggestion came out that we needed to be there for her not only now, but when the dust settles (so to speak) as they try to get back to daily activities and their new normal. We decided that we would put together a calendar with a  FAMILY HELPER. We'd each take a month and for the next year, we would do something for the family. We decided it could be a hand-written letter letting them know we care, a gift card for dinner out, a movie rental, dinner delivered, a small gift for their surviving son, etc. We also decided that we would include the same card each time so that she knew it was from the Sorority. And within a matter of hours, we had the calendar filled--each month with two helpers! Most of the sisters that came forward went to school with this sister, now grieving mother, but a few did not. It brings me such joy to know that through good times and bad, we are there for each other--just like real sisters. It's amazing that we can go 6 months or a year without seeing each other and picking up where we left off. Or, finding out that we live close by to a sister we haven't met yet and make it a point to meet each other and create a new friendship. That is the bond of sisterhood.

I hope our friend and sister will find comfort in our FAMILY HELPER.

I created a FREE Printable from a quote I found that I included with my card to the family at the wake. Just click and print.
Friends will be there quote


Have you done anything special for a grieving family? I'd love it if you would share.

God Bless You Grace, may you rest in peace sweet child.

Cindy


Pin It!

Tuesday, March 26, 2013

Tasty Tuesday--Chicken Caesar Salad Sammies

I had another DUH moment last week--I'm starting to worry myself, seriously--I mean, how many can we have before we hit 40??!! Well, whenever I take a trip to Sam's Club, I always buy a rotisserie chicken--they are delicious, huge and only $5! Plus, you can use it for so many things! We are a busy family and the sports season is beginning already. One kid is in volleyball and the other is starting baseball soon, so quick dinners are a must! This took less than 15 minutes to assemble, thanks to the help of Sam's Club's rostisserie chicken!

If you love Caesar Salad (I do!), this is a perfect meal when you don't necessarily feel like just eating a salad. You could even make this into a wrap (which I suggested to the kids, but was shot down!). And even if you didn't care for Caesar dressing, Ranch or Zesty Italian would work too! My mouth waters just looking at the picture and remembing this sammie!
Chicken Caesar Salad Sandwhich

Chicken Caesar Salad Sammies

Ingredients

1-2 cups shredded chicken (depends on how many sammies you make)
Shredded Romaine Lettuce--per taste
Caesar Dressing (we love Ken's Lite Caesar Dressing--its not the creamy kind)--per taste
Shredded Parmesan Cheese--per taste
Croutons (ours are homemade--so easy and delicious)--per taste
Ciabbata Rolls or tortilla wraps

Directions

In a large bowl, combine all ingredients until it looks like a good balance of salad vs. chicken. I just eye-balled the amounts according to our families tastes. Spoon (or pile) on sliced Ciabbata Rolls. Seriously easy. Extremely delicious!

My kids gave this 2 thumbs up and told me we needed to have it again real soon! So, what are your favorite recipes for rotisserie chicken?

Cindy

Pin It!

Monday, March 25, 2013

Crazy! Super Simple Trick!

If your kids love pb&j like my kids do, you are going to love me for this crazy, simple trick. Especially if they don't care for crusts! My friend Angie gets full credit for this one--I saw her preparing her kids lunch one evening while we were over for a cookout and I didn't understand what she was doing--so I asked and the DUH moment sunk in. How could I not know this!! But, ever since, my kids laugh at me when make their pb&j's, but hey--it works and they are happy because there are no crusts! And I'm happy because I don't have to pay an arm and leg for the "real" uncrustables! Prepared to be shocked--
DIY Uncrustables

This takes a few seconds longer to prepare than your normal pb&j. Get your pb&j ingredients ready and grab a wide mouth glass.

Prepare your sandwich as usual. Now, set your glass over the sandwich. Press and turn.
DIY Uncrustable
 
 
Remove the glass.
 
DIY Uncrustable
 
Now, pull away the crust (and eat--I give you permission). TaDa--your very own, DIY Uncrustable! Save yourself some money and try this the next time you make pb&j's for your kiddo's!

DIY Uncrustable

Crazy, huh?

Cindy

Pin It!

Friday, March 22, 2013

Photo Garden Spring Craft

Hello friends! Did you know it's officially Spring? We are 3 days in and there are still no signs of it around here! And they are calling for more snow this weekend! AGH! I want to wear flip flops and run outside! Anyways, I've got a cute little craft that Carson and I did together awhile ago. We decided to give it to Grandma Rowe for her birthday, but I think it would be a nice Mother's Day gift, too!
The project takes just a few supplies to come together, which you could purchase at the Dollar Store, if you didn't already have them in your craft supplies at home! You will need a sytrofoam circle (or square would work too!), craft sticks, craft paint, pictures of your kids, craft punch or scissors, hot glue gun, ribbon and tag.
photo garden

First Step:
Paint your craft sticks. We decided upon 4 different colors. Carson got crazy mixing up the paints on the sticks to make it more colorful. I love how they turned out! Allow paint to dry.
Second Step:
Cut the faces out that you want to display in your garden. I used a craft punch, but scissors would work just fine too! I punched out 2 additional scalloped punches from scrap paper to put behind the picture to give it a finished look.
Third Step:
Once the paint on the sticks is dry, you are going to break off pieces at one end to give a jagged fence look. If you didn't want a jagged fence look, you could cut off the ends so all of the sticks were the same size, but a little bit taller than the foam circle. Keep the broken or cut ends to use later! Keep enough sticks for the amount of pictures you have--these you will want longer.
Forth Step:
Hot glue the cut sticks around the foam circle--make sure to line them up evenly at the bottom edge of the circle. Allow to dry. Wrap a piece of ribbon around the fence to give it a complete look, hot glue to keep in place. Attach a tag if you wish.
Fifth Step:
Grab your pictures and broken/cut sticks and create a "flower" pattern with the sticks behind the picture. Glue sticks together and to the picture. Now, glue the flower to a painted craft stick. On the opposite side of the flower, hot glue the cut-out scrap paper to cover the back of the picture. Stick into the foam circle.
Last Step:
Hot glue some "grass" to cover up the foam circle. We used green shredded paper from the Target Dollar Section (LOVE!). Now, wrap it up and give it away--or display it with pride in your home or office!

What do you think? For less than $5, I created a nice gift for a special person! I think it turned out great--what a way to cheer someone up too! Who said a garden had to have real flowers in it?!?!

If you like this project, please comment and share! Thanks!

Cindy

Pin It!

Tuesday, March 19, 2013

Tasty Tuesday--Easy Breakfast Casserole

It's that time of the week--Tasty Tuesday! I'm sorry if I haven't posted since last Tuesday, but my week was horrible and I decided to spend my free time with my kiddos. Hope you understand. Today, I'm bringing you a recipe I found years ago (with no credit resources anywhere, sorry) but I recently started to make it for my family. It's a winner. And funny that I call it Breakfast Casserole, because as my daughter pointed out the last time we had this, we've never actually had this at breakfast time. This is my standby for Breakfast for Dinner nights (do you have those?--I love them!). What's great about this recipe is that you can really change it up to suit your family, your mood or what you have in the frig--most things work! Serve it along side some fruit and you've got a delicious meal!
Easy Breakfast Casserole


{EASY} Breakfast Casserole

Ingredients
1 pkg. refrigerated croissant rolls (I used reduced fat)
1-2 cups shredded cheese (I use about 1 cup, usually a mix of mozzarella or reduced fat co-jack)
1/2 lb. crumbled, cooked bulk sausage
4 eggs
3/4 c. milk

Directions
Preheat oven to 375 degrees. Prepare pan (I use a round stone casserole, but I'd suggest an 8x8 or 9x9 dish if you don't have one like mine) with cooking spray (not if you are using stone!).  Combine eggs and milk and whisk together. Set aside. Take croissant rolls out of the package and lay them in the pan, creating a small edge up the sides of the dish. Pinch seals together. Sprinkle sausage over rolls. Sprinkle cheese over sausage. Pour egg mixture evenly over dish. Bake 15-20 minutes or until cheese is melted and eggs are set. Let rest 5 minutes before serving.
You could add peppers, onions, bacon, etc. according to the likes of your family.
Breakfast Casserole

This would be great for Easter morning because it takes little time to put together--just cook the sausage the night before and then assemble and bake in the morning. Maybe I will serve it for the first time at breakfast on Easter morning!
Easy Breakfast Casserole

I'm excited to be going to the Taste of Home Cooking School tonight with my mother-in-law and sister-in-law. I've been twice in the past and usually pick up a good tip or two as well as some tasty recipes! Have you ever been? Maybe I'll be able to whip something up and share it with you next week!

Thanks for stopping by!

Cindy


Pin It!

Tuesday, March 12, 2013

SKINNY, but Delicious Chocolate Cake

Low-fat and delicious--could it be so? I whipped this cake up for a celebration we had over the weekend. My mother-in-law's birthday is tomorrow, but we celebrated on Sunday. I know she watches her calories like I do, so I thought I would give this Hungry Girl recipe a try. Have you ever caught one of her episodes on the Food Network? Love the easy swaps she makes to cut fat and calories on everyday recipes. This cake was so simple, super tasty--what more can you ask for?

Low-Fat Chocolate Cake

Ingredients
1 box Devils Food Cake Mix (moist)
1 can canned pumpkin
Frosting (I used Chocolate Cool Whip Frosting)

Directions
Preheat oven to 400 degrees. In a bowl, combine the cake mix and pumpkin and mix together. Don't add anything else. This batter will be very, very thick. Spread into a 13x9 cake pan that has been lightly sprayed with cooking spray. Bake at 400 for 30 minutes, check the box to be certain you don't over bake. Check to see if the cake is done by inserting a knife into the center of the cake. If it comes out clean, its done. Let cool. Frost and decorate as desired. I took my vegetable peeler to a chocolate bar and make little chocolate shavings all over the cake! According to the Hungry Girl website, the cake has 181 calories and a Weight Watchers value of 4, without the frosting and chocolate shavings.

skinny chocolate cake


Have you ever tried to make "skinny" recipes? I have a few more I'll be showing you in the upcoming weeks! And, have you tried the Cool Whip Chocolate Frosting? It's tasty! I could slather this on some graham crackers or on vanilla wafers! Thank goodness we have some leftover!

Have a great week!

Cindy

Pin It!

Monday, March 11, 2013

Cupcake Wars Birthday Bash

I'm so far behind in posting this up on the blog. My daughter celebrated her birthday at the end of December. How pathetic is it that I am now getting to posting about her awesome birthday? She turned 11 in December and requested a "fun" birthday party. After brainstorming for a bit, I realized that one of our favorite shows to watch together is Cupcake Wars on Food Network. I mentioned my idea to her and she loved it. She wanted the theme to be "One Direction" and wanted the entire party to be a secret to her friends. 
cupcake wars birthday party bash

We created a cupcake-shaped birthday invitation. They were made out of scrapbook paper, stickers and rhinestones.I found these via Pinterest, which takes you to this cute blog. Hailey was able to cut and assemble them herself. I created the party information on the computer, printed it off and glued it to the invite.
cupcake wars birthday party invites

Next came the preparation and planning for the big day!
  • First there would be 2 teams. 
  • They would have 2 hours to make and decorate their cupcakes as well as create a stand for their cupcakes. 
  • We would set-up two stations--one at the kitchen counter and one at the kitchen table. I decided to put up a large plastic tablecloth to block the teams from seeing each others creations.
  • I set-up a table with all the supplies they could use for their cupcakes and their stands. 
  • Each team received a basket full of the kitchen supplies they needed to prepare their cupcakes. The basket include bowls, measuring cups and spoons, oil, eggs, cupcake pans, mixing spoons, frosting (homemade by the birthday girl's request), cake mixes and a SECRET INGREDIENT! They needed to work this secret ingredient into at least one batch of the cupcakes in some way. The secret ingredient was Cookie Dough Bites candy. I also gave each team 2 cake boards and 3 used toilet paper rolls for the cupcake stands. 
cupcake wars birthday party basket of goodies

cupcake wars birthday party supplies
When all the girls got to the party we had them gather in the basement living room and made the big announcement. Only 2 girls at the party had never seen the show before, so they were going to be on separate teams. Next, we split the girls up to make equal teams. They came up with their team name and then the clock started. Each team was allowed to "ASK THE BAKER" one question. This could be anything! (neither team did!). Because we only have one oven and each team was making 24 cupcakes, each team was allowed to put one cupcake pan in the oven at a time.  I also reminded the girls that they needed to allow time for the cupcakes to cool before frosting them.

The girls worked hard and very well together. One team designated who was doing what, the other team just did everything together. One team used the artistic strength of one of the girls to paint the cupcake stand like the Union Jack Flag which represents One Direction. They were laughing, being silly and really having fun in the kitchen. One team finished with minutes to spare while the other team came down to the final seconds before finishing! It was really exciting. Here are a few snapshots I took during the party:

Next, the girls had to present their cupcake displays and cupcakes to the judges (me, her dad and her brother)(this was a very tough job, I tell ya!). They were being judged on appearance, taste, use of secret ingredient and theme as well as the cupcake stand and kitchen clean-up (very important!!). It was super close. Each team did such a fantastic job, but it came down to the use of the secret ingredient--we liked how the winning team put theirs into the batter versus chopping and sprinkling on top!


After the competition, we opened gifts and ate cupcakes! Each girl took home a cupcake, too!

Aren't they such beautiful girls?

All-in-all, this was such a fun party to prep and watch! And I think Hailey had a happy birthday celebration too!

Do you do themed birthday parties for your kids?
cupcake wars birthday bash

Cindy

Pin It!

Saturday, March 9, 2013

DIY Workout Shirt **SUPER EASY**

Today I'm going to share something I did back when it was warm out. I dream about those days now...I know its just around the corner, but it can't be here soon enough. The painting technique I showed you on my very first blog post , using fabric spray paint. My son did his version and this is mine. I love all things Zebra--and have since college (the Zeta Beta Chi sorority mascot is the Zebra--we are all the same, yet different!), so why not custom make my own hot pink zebra shirt for my workouts?

Here is how I painted my shirt:
DIY Zebra Striped Painted Shirt

First Step:
Make sure your shirt has been washed and dried. Grab a 5 Gallon Bucket and put shirt over top. You can see the collar on top of my bucket. Gather up the shirt, like scrunching it, to give it the different dimensions.


DIY Zebra Striped Painted Shirt

Step 2:
Take your Fabric Spray Paint and spray it generously over the shirt. Let dry as directed on the bottle.


DIY Zebra Striped Painted Shirt
FINAL:
Here is the end result of my painted shirt! I bought an XL shirt because I knew I wanted to make it a loose, fun shirt for my Zumba Classes. However, the XL was too big, so now I only wear it when I exercise at home. I recommend if you are following these steps for the end result workout shirt, just go up one size larger, not two!


Now, you could stop there and be done, but I wanted to make a workout shirt. I pinned this a long time ago and knew I had to make it for my Zumba classes! I followed the directions that Rabbit Food For My Bunny Teeth provided in her blog post. Her step-by-step instructions make it super simple! And here is what my shirt looks like:
DIY Zebra Workout Shirt--super easy!


(sorry for the weird smile--its hard to take a great picture of yourself, by yourself, in the mirror. Just sayin'.)

Here's the back view:

DIY Zebra Workout Shirt--super easy!


I love it and Catherine over at Rabbit Food couldn't have made an easier tutorial. (fun blog, too!)

So now I've given you a workout and a workout shirt...there are no excuses! Now, get up and start moving!


Cindy

PS: Hey--if you liked this blog post, please consider commenting or sharing. I appreciate anything you can do!

Pin It!

Wednesday, March 6, 2013

Versatile Blogger Award!


Wahoo! I can't tell you the excitement that I had when Kathie left me a message telling me she nominated me!  Thank you so much to Sassy Little Lady for nominating me! Here are the rules for receiving this award:
1. Thank the person who gave you the award.
2. Include a link to their blog.
3. Tell the people you nominated (and your blog readers) 7 things about yourself.
4. Select 15 blogs/bloggers that you’ve discovered recently or follow regularly.
5. Nominate those 15 blogs/bloggers for The Versatile Blogger Award (include a link back to your post!)
 
Here are seven things about me:
  1. I married my high school sweetheart. We broke up during college, got back together our Senior year (in college) and married a few years later. We have two terrific children. Hailey is 11 (going on 18) and Carson is 7.
  2. I founded a local Sorority in college. This year we celebrated 19 years! I could be the new actives Mother...(exciting and depressing at the same time). Founding Zeta Beta Chi with 15 other amazing ladies has to be one of my most proud moments, ever. 
  3.  I work full time as a Marketing Professional. 
  4. I love Diet Coke. I tried to give it up and did so for about a month. I didn't feel any different (for the better) while I took the time off, so I decided I could continue. (he, he) 
  5. I enjoy exercising. I always have. About 5 years ago I lost 50 pounds. I've been able to keep it off this entire time. Another very proud moment in my life. 
  6. When I was in High School, I wanted to be a dolphin trainer. I still think it would be an awesome job. To this day, I haven't touched a dolphin, but one day, I hope to take a swim with them. 
  7. My family is taking a trip of a lifetime this summer. We are heading to England, where my husband's mother grew up. The trip is to celebrate our 15 year Wedding Anniversary. 
  8. Favorite Movies: Say Anything, Christmas Vacation, and the newest--Pitch Perfect. 
  9. My favorite stand-by lunch or dinner (for myself) is apple with peanut butter and popcorn. Just ask my family! 
  10. 10. ...I love to talk, be the center of attention...it's ALL ABOUT ME! (that's why I couldn't stop at 7 things!) I am an open book. So if you have a question for me, let me know!

Now, I get to nominate 15 blogs/bloggers that I love!


Now--hurry on over and check out these blogs! Thank you again to Sassy Little Lady !

Hope you learned a little about me today! Thanks for stopping over!

Cindy
 

Pin It!

Tuesday, March 5, 2013

Tasty Tuesday--Cinnamon Twists

Happy Tuesday! We are expected to get a bunch of snow today. Not looking forward to it. I am so over this winter and so ready for spring! I've got a sweet, easy treat--perfect for snow days! Chances are, you've got these ingredients in your frig and pantry! Surprise your family with these sometime soon--they'll love you for it!

cinnamon twists


I clipped this recipe out of a Taste of Home magazine many years ago.

Cinnamon Twists

1 pkg. refrig crescent rolls (8 oz)
1/4 c. packed brown sugar
2 Tbls. butter, softened
1 1/2 tsp ground cinnamon

Glaze:
1/4 c. powdered sugar
1 Tbls. butter, melted
1 1/2 tsp hot water
1/8 tsp almond extract

Directions:
Separate crescent roll dough into four rectangles; press seams to seal. In a small bowl, combine brown sugar, butter and cinnamon; spread over two rectangles. Top with remaining two rectangles. Starting from a long side, cut each rectangle into eight strips. 


Twist each strip several times; seal ends together.


Place on greased baking sheets. Bake at 375 degrees for 10-12 minutes or until golden brown. Immediately remove to wire racks. Combine glaze ingredients; brush over warm twists. These are best when enjoyed while they are still warm. Kids loved these!

cinnamon twists


Whoever is doing the snow dance...please stop. I'm done with this weather. Thanks!

Cindy

Pin It!

Monday, March 4, 2013

March Fitness Challenge Photos

Hello peeps! I hope you had a great weekend! Too bad it's Monday already and I'm heading to work! And bummer, more snow is expected too. I WANT SPRING! So, how many of you are doing the March Fitness Challenge? I started on Saturday, today is my second day! (if you haven't joined yet, you still have time! Click here for the details!)Those V-Ups are a killer! I figured I would show you the exact move you should be doing for each exercise as well as a few Trainer Tips.
My friend, motivator and trainer Linsey was kind enough to help me out with these pictures as well as the Trainer Tips. Linsey is amazing. I met Linsey at the Y where I workout. She is a trainer and fitness instructor at the Y. She is a mix of Bob and Jillian from the Biggest Loser--and I love that about her! She is energetic, fun and silly. She makes every class worth attending. For me, she is a great motivator because she cares about your goals and knows when to push and when to lay-off. And I love that she knows where I'm coming from. She has fought the fight to be fit). Have I mentioned that she is amazing? Anyways, on to the pictures...

On all moves, remember: chin off the chest, keep core engaged with belly button pulled towards spine, and shoulders down and out of the ears.


Scissor Kicks
Trainer Tips:
To help support lower back, hand can be placed to the side and slightly under hips. To advance move, pull shoulder blades up off of the floor in crunch position with chin off of the chest.

scissor kicks


scissor kicks


Bicycles
Trainer Tips:
Fingertips placed behind the head, not interlocking to refrain from putting extra strain on the neck. Elbows should be wide at all times. Drive up with the core/chest to pull shoulder blades off of the floor.
bicycle starting position


bicycle crunch


Toe Touches
Trainer Tips:Keep chin off the chest.

toe touches starting position


toe touch crunch


Double Crunches
Trainer Tips: Remember to keep chin off of chest. Fingertips only to back of head, never interlocking to refrain from putting extra strain on neck. Feet flexed, and tucked towards bottom.
double crunch


double crunch

V-Ups (or Jack Knife)
Trainer Tips: Move shown is advanced with legs straight.  If move is to difficult to begin then start with bent knee and graduate to straight leg. Also, a side note that if existing shoulder issue exists, complete arm movement as a chest press vs. a pullover. Chin off of chest always.
v-up of jack knife


v-up or jack knife


Plank
Trainer Tip: If doing bridge position from forearms ensure the elbow is directly under the shoulder. Head and neck are in alignment with spine, looking towards the floor. In high position wrists should be positioned directly under the shoulder. Head and neck in line, neutral with the spine.
plank beginner


plank on forearms


planks on hands


Thank you Linsey (isn't she the cutest?) for squeezing in time for this photo shoot so I could provide my readers the proper technique! If you have any questions, post a comment and I'll be sure to have Linsey answer them for you!

Cindy

Pin It!
Related Posts Plugin for WordPress, Blogger...